


The Correct Roof Shingle Exposure for 3-Tab and Laminate Shingles

By IKO.
Shingles with the right exposure will create the intended look and, assuming all else is installed properly, will provide optimal protection to the roof.
Editor's note: This article is a nice refresher for your crew and a good learning tool for new employees.
A shingle’s exposure is the portion of the shingle left uncovered by the one above it. Proper shingle exposure is achieved by carefully layering the shingles as you work up the roof plane.
If the shingles are layered too far apart, the shingle exposure will be too wide, potentially exposing areas of the shingles to the elements that are not designed for the task. If shingles are spaced too closely together, they may not look as intended, especially if they have shadow lines, not to mention being a waste of material.
In either case, too close or too far, improper exposure makes it difficult, if not impossible, to properly position the nails and the self-sealing adhesive to achieve the best wind resistance. Many shingle manufacturers’ limited warranties are void if their shingles are not installed in accordance with the application instructions.
Though some roofing contractors assume all asphalt shingles and architectural shingles have the same exposure, they actually vary widely. In the past, a 5-inch exposure was most common, but things have changed. The proper shingle exposure can depend on the size of the shingle, its material and the desired look of the roof.
3-Tab Shingle Exposure
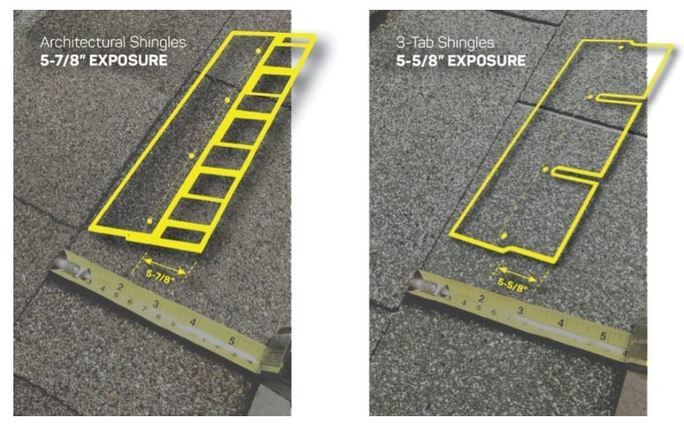
In the past, most 3-tab shingles were “Imperial”-sized at 12 inches wide and 36 inches long with an exposure of 5 inches. Now, most 3-tab shingles, typically referred to as “metric” shingles, are larger. Metric shingle exposure is proportional to their larger size, commonly 5 5/8 inches. For example, IKO MarathonTM Plus AR has a 5 5/8-inch exposure. However, you should consult with the manufacturer to confirm shingle exposure.
Laminate Shingle Exposure
Laminated or architectural shingles have a wider variety of exposures. The maximum exposure for laminated shingles is 10 inches, but it all depends on which specific shingle you use. Other laminated shingles may have exposures as small as 5 inches. Overall, the roofing industry is changing to meet consumer demand for more elaborate shingles, which sometimes means creating unusual sizes.
IKO’s architectural shingles are available in “advantage” size. These shingles are larger than most competitors’ products, larger even than most “metric” shingles, with a 5 7/8-inch exposure. Shingles available in advantage size include IKO Cambridge™, IKO Cambridge™ IR with ArmourZone® and IKO Dynasty® with ArmourZone®.
Fewer courses, or rows, of advantage-sized shingles need to be used for the same roof area. For the roofing professional, this means easier and faster installation as well as savings on material costs.
A wider shingle exposure can also give an enhanced appearance without burdening the homeowner with the high cost this aesthetic usually demands. In fact, IKO’s Dynasty® shingles have deep shadow bands, which add contrast and create a stunning appearance. If these shingles are installed with a smaller exposure, the shadow bands may not be visible, so correct installation is key.
IKO also offers one of the only laminated shingles with 10-inch exposure: Crowne SlateTM. This generous exposure helps Crowne SlateTM emulate the look of real slate tiles. Shingles with such wide exposures look especially stunning on large roofs and those with steep pitches. IKO’s buyer’s guide to residential roofing products can help you decide if these shingles are right for you.
Wind Resistance and Shingle Exposure
Using the correct exposure is critical to obtain the optimum wind resistance of your shingles. Most shingles are manufactured with a strip of adhesive that self-seals with sufficient heat from the sun. Using the correct exposure ensures that this sealant strip is properly positioned for maximum performance. The wind resistance rating of a shingle is dependent on proper nailing position and exposure, so any deviations from the specification may invalidate the rating.
You can also follow the High Wind Application procedure for most of IKO’s laminated shingles to provide further wind protection. High Wind Application typically calls for securing the shingle with six instead of four nails, may require manually sealing the shingles, and more. For the full details on High Wind Application refer to the application instructions for your specific shingles. It is worth noting that IKO’s Dynasty and Cambridge IR shingle styles have the ArmourZone tape. High Wind Warranty coverage is offered on these styles using a four-nail application.
Shingle Exposure Concerns When Replacing a Roof
When you are replacing the shingles on an existing roof, shingle exposure is a key consideration. Because the old shingles may not have the same exposure as the new shingles, it is not good practice to simply install the new shingles over the older shingles.
When any shingle of a different exposure is installed above another, even if they are both 3-tab asphalt shingles or both architectural asphalt shingles, there may be issues. The bottom shingles may create an uneven surface for the top shingles, which may then deform, which can affect their ability to seal properly.
If the existing roof’s shingle exposure matches the new shingles, the new shingles are sometimes “nested” onto the roof. Nesting is a technique where a roofing professional applies the top edge of the new shingle at the bottom edge of the old shingle. This will only work if the old and new shingles have the same exposure.
Even when the new shingles have the same exposure as the old, it is good practice to remove the old shingles before beginning installation. Then, your new shingles will be applied to a smooth, even surface, which gives them the best chance to perform as designed. At any rate, the International Building Code limits the maximum number of shingle layers to two. Please check manufacturers’ installation instructions and limited warranty requirements to ensure that installing old shingles over new shingles are in accordance therewith.
Proper shingle exposure is essential to achieving the best roof performance.
To learn more about a specific shingle’s exposure, refer to the product’s installation instructions or contact an IKO representative.
Recommended For You

How to Collect and Respond to Reviews
Read More ...
Allied Building Products Offers Free Trial of CompanyCam App to Contractors
Read More ...
Johns Manville’s New Sprayable Adhesive is Always in Season
Read More ...


Comments
Leave a Reply
Have an account? Login to leave a comment!
Sign In